Garden Slideshow Inspiring Outdoor Spaces
By Sarah Jenkins (BIID Associate Member | BA (Hons) Interior Architecture, Chelsea College of Arts) | November 2, 2026 | 12 min read
Editorial & Affiliate Disclosure: LUMAA HOME is reader-supported. Our editors independently research, test, and specify every material and product featured. When you purchase through retailer links on our site, we may earn an affiliate commission at no extra cost to you, in accordance with UK ASA guidelines.
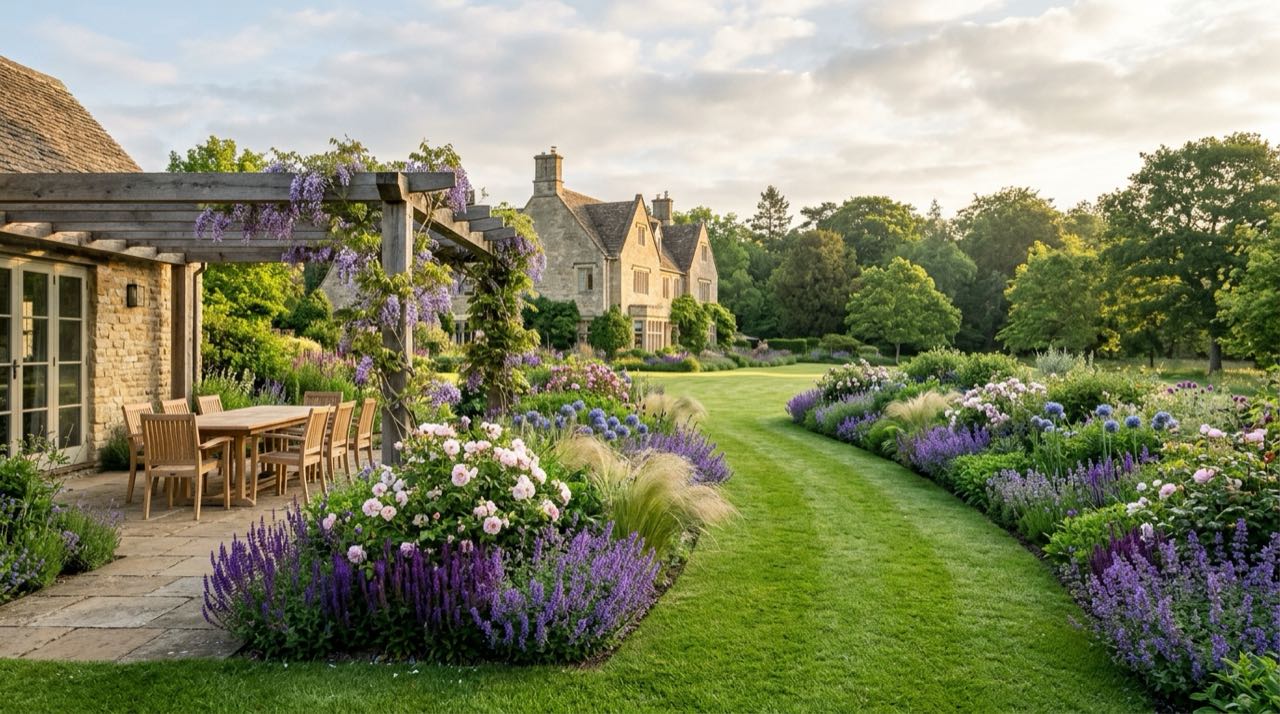
Planning Your Garden Layout Step by Step
Average residential gardens measure between eighty and two hundred square metres. Covering an entire plot with a single lawn without defined boundaries reduces usable space and leaves perimeter fences exposed to view. A structured garden zoning plan establishes dedicated areas for outdoor dining, perennial borders, vegetable production and waste storage.
Studying an architectural garden slideshow clarifies how different hard and soft surfaces divide space. Separating a plot into paved terraces, deep planting beds and access paths organizes daily movement while ensuring plant groups receive their required sun exposure.
Ground levels around residential buildings require strict height checks. Finished patio surfaces must sit at least one hundred and fifty millimetres below the damp proof course of adjacent exterior brick walls. This vertical clearance prevents rain from splashing above the waterproof barrier and entering interior wall cavities.
Laying a Solid Patio for Outdoor Dining
The dining terrace zone requires an excavated depth of one hundred and fifty millimetres down to firm subsoil. Lay a commercial geotextile weed membrane across the excavated base, followed by one hundred millimetres of Type 1 MOT crushed limestone. Run a vibrating plate compactor across the stone in three separate passes to complete sub-base compaction, preventing surface hollows where rainwater pools.
For paving slabs, rivington yorkstone paving provides a textured natural surface suited to period properties, whereas vitrified porcelain outdoor tiles provide an R11 slip rating and zero water absorption. Hard paving requires patio drainage falls of 1:60 to 1:80 sloping directly away from house foundations toward perimeter flower beds or linear drainage channels.
Building Wide Gravel Paths Between Different Areas
Main garden paths require a clear width of ninety centimetres to allow unobstructed movement for loaded wheelbarrows and standard petrol lawnmowers. Permeable gravel garden pathways absorb heavy rain directly into the subsoil, reducing runoff into domestic drainage networks.
Specify cotswold stone gravel graded between fourteen and twenty millimetres. Smaller ten-millimetre shingle gets caught in footwear treads, while gravel larger than twenty millimetres creates an unstable walking surface. Lay a rigid interlocking gravel grid underlay over a geotextile membrane to hold stones in place. Construct a perimeter herringbone brick path course embedded in concrete haunching to prevent stone migration into adjacent soil.
Testing Your Soil and Fixing Wet Ground
Plant establishment depends directly on soil composition, aeration and drainage capacity. Domestic ground conditions range from alkaline chalk over limestone to acidic sandy soils and dense heavy clay across low-lying valleys. Conducting digital soil ph testing identifies whether soil acidity falls within the optimal 6.0 to 7.0 range required for mixed border planting.
Soil preparation also addresses seasonal water tables. Compacted soil holds standing water during wet winter months and turns solid during dry summer periods. Improving soil structure creates root pores that support healthy root development while maximizing long-term soil moisture retention during summer droughts.
Breaking Up Heavy Clay with Grit and Mulch
Borders with heavy clay soil retain high mineral nutrients but suffer from poor drainage in winter and surface cracking in summer. Break down dense clay by incorporating coarse horticultural grit and well-rotted organic matter mulch at a ratio of two wheelbarrows per square metre. Apply a ten-centimetre layer of composted bark dressing across the surface each spring to encourage earthworm burrowing, which aerates the topsoil naturally.
Where water pools continuously across low lawn sections, install a sub-surface gravel drain. Excavate trenches fifty centimetres deep with a 1:100 fall, insert perforated land drainage pipe wrapped in geotextile fleece while backfilling with washed twenty-millimetre aggregate to channel excess surface runoff safely into soakaways.
Handling Hot Sunny Corners and Cold Shady Borders
Solar orientation determines plant suitability across different garden boundaries. A south-facing sun trap receives six to eight hours of direct midday sunlight, providing ideal conditions for Mediterranean sub-shrubs. A north-facing shade border receives primarily indirect daylight and cooler soil temperatures, requiring woodland plants adapted to low light.
Cold air drains down slopes and collects in low boundary dips, creating a frost pocket location where tender spring shoots risk freeze damage. Along open boundaries exposed to prevailing westerly winds, install a permeable windbreak planting using deciduous hedging like field maple and hornbeam to reduce wind speed without generating downward turbulence.
Creating Flower Borders with Repeat Planting
Balanced planting designs group perennials in repeating drifts of three, five or seven plants rather than scattering individual specimens across the bed. A classic perennial cottage border layers tall flowering spires, flat landing pads and an ornamental grass drift to provide varied foliage textures throughout the growing season. Consult our guide on designing a modern cottage garden for specific companion planting ratios and bed depth measurements.
Plant selection requires checking the official rhs hardiness rating. Species rated H4 to H7 survive typical winter freezes down to minus ten degrees Celsius without requiring fleece wraps or winter storage. Grouping plants with identical watering and soil drainage requirements ensures borders establish uniformly without spot treatments.
Tough Plants for Hot Dry Borders
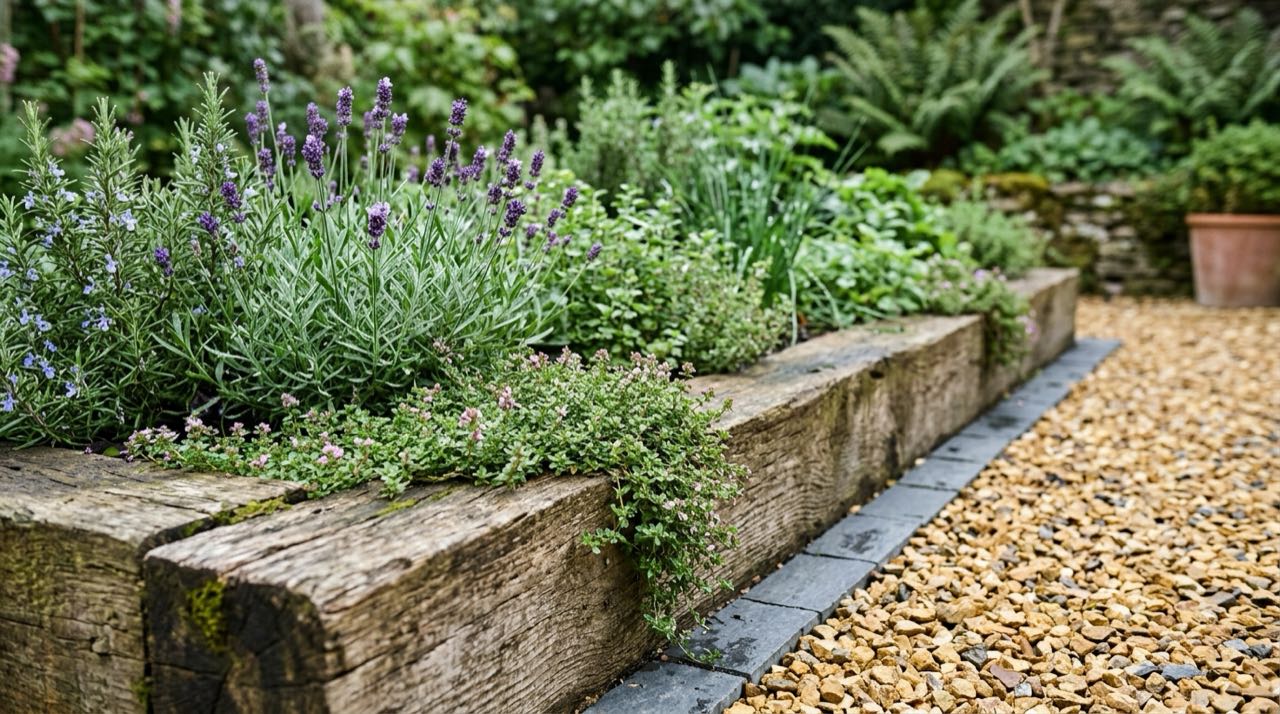
Sunlit beds with free-draining sandy loam support a drought-tolerant planting scheme that requires minimal irrigation after initial establishment. Plant salvia nemorosa drifts using upright purple varieties like 'Caradonna', bordered by neat lavandula angustifolia hedging along stone edges.
Integrate allium bulb groupings such as 'Purple Sensation', airy purple verbena bonariensis stems and trailing creeping thyme planted directly into gravel margins. These pollinator-friendly herbaceous plants support local bees and hoverflies while producing continuous purple, violet and silver foliage tones from June through September.
Tough Plants That Grow Well in Cold Shade
Shaded borders alongside north-facing fences or beneath mature deciduous trees require plants adapted to low light. For bold foliage contrast, plant dry shade hostas like 'Halcyon', which develops thick blue-grey leaves that deter common garden slugs.
Ground cover beneath shrubs is achieved using hardy geranium groundcover varieties like 'Rozanne' and Geranium macrorrhizum, which suppress annual weeds through dense root mats. Combine tall white japanese anemone clumps for late-season flowers, white hydrangea paniculata blooms for mid-tier volume and evergreen structural shrubs like sweet box (Sarcococca confusa) for fragrant winter flowers.
Clever Privacy Ideas to Block Overlooking Neighbours
Urban and suburban properties frequently face overlooking from two-storey neighbouring windows toward private patio areas. Erecting solid timber fences above standard two-metre heights creates dark, enclosed boundaries while exceeding standard permitted development fence heights without local council planning permissions.
Examining our architectural garden slideshow illustrates how living screening and layered planting achieve privacy within statutory limits. Living boundaries filter ambient traffic noise, soften brick walls and diffuse strong crosswinds without creating dead shade.
Pleached Trees and Thick Evergreen Hedges
To screen second-floor windows, plant a row of pleached hornbeam trees (Carpinus betulus). These trees are trained on clear stems measuring 1.8 metres tall with flat rectangular foliage screens that extend privacy up to three metres above ground level without taking up space at lawn level.
Beneath tree trunks, install a vertical green boundary wall using English yew (Taxus baccata) or cherry laurel (Prunus laurocerasus). Yew provides a dense, dark green evergreen screen that tolerates annual clipping to an exact width of forty centimetres, providing a formal backdrop for summer flowering perennials.
Climbing Roses and Cedar Slats on Fences
Upgrade weathered boundary fences with horizontal slatted cedar screening built with ten-millimetre gaps between battens. Western red cedar contains natural preservative oils that resist insect attack and rot without chemical treatment, while the horizontal gaps allow air to pass through freely during high winds.
Fasten a treated boundary timber trellis to fence posts to support climbing fragrant roses such as 'Gertrude Jekyll', combined with vigorous Clematis montana. Cut clematis back immediately following its late spring bloom to manage stem volume and stimulate bud development for the next season.
Building Raised Beds for Fruit and Vegetables
Productive fruit, herb and vegetable growing requires organized spatial boundaries. Planting crops in open, unedged soil often results in waterlogged root zones and compacted walking paths during wet winter months.
Constructing raised sleeper beds isolates growing compost from native subsoil, accelerates spring soil warming by up to three weeks and eliminates bending to ground level during weeding and harvesting.
How to Build Wooden Sleeper Beds That Last
Construct raised planters using untreated European oak sleepers or pressure-treated pine sleepers measuring one hundred millimetres thick by two hundred millimetres wide. Stack sleepers two courses high to establish a working depth of forty centimetres. Fasten corners using two-hundred-millimetre corrosion-resistant timber screws driven through pre-drilled pilot holes.
Line internal sleeper walls with heavy-duty damp proof membrane to prevent moist compost from contacting the timber directly. Set bed widths between ninety and one hundred and twenty centimetres, allowing complete arm reach to the centre from both sides without stepping onto growing soil.
Setting Up an Easy Kitchen Garden Patch
Lay out beds in a symmetrical potager kitchen garden format separated by seventy-centimetre gravel paths, with a covered rainwater collection butt linked to adjacent shed downpipes. Implement a four-year crop rotation dividing legumes, brassicas, root vegetables and alliums to prevent soil pathogen build-up.
Install a porous drip irrigation soaker hose beneath the organic mulch, controlled by a battery tap timer. Drip watering delivers measured water straight to plant root zones at 05:00, lowering water loss from evaporation by sixty percent compared to overhead sprayers.
Adding Water and Cosy Seating Areas
Incorporating water features into garden designs masks urban background noise through acoustic water movement while providing essential drinking water for birds and pollinating insects.
Effective garden planning incorporates distinct functional destinations that encourage outdoor movement. Directing circulation paths toward a definite garden focal point, such as a carved stone basin, an armillary sphere or an outdoor garden mirror, enhances perspective by reflecting daylight into shaded corners.
Digging a Stepped Pond for Birds and Frogs
Excavate a wildlife garden pond with three distinct level depths to support balanced aquatic zones. Dig an outer fifteen-centimetre shelf for marginal bog plants, a forty-centimetre intermediate shelf for oxygenating weeds and a central sump measuring at least sixty centimetres deep to ensure water remains unfrozen in winter.
Line the excavation with three-hundred-gram needle-punched geotextile underlay before installing a 1.0mm butyl rubber liner. Install a low-wattage submersible water pump delivering water through a stone feature to provide continuous surface oxygenation without creating high turbulence that disturbs insect larvae.
Sunken Firepit Seating and Shaded Benches
In exposed gardens, excavating a sunken seating firepit area forty-five centimetres below lawn level creates a sheltered microclimate protected from prevailing winds. Build low retaining stone walls around the perimeter and lay permeable stone slabs over a sub-base drainage sump. If planning an enclosed stove inside your sunken seating zone, verify minimum fence clearances and wind cowls in our garden log burner safety and flue guide.
Construct a timber built-in seating bench with lift-up lid access for storing outdoor throws and cushions. In compact gardens, position a shaded reading nook under tree canopies, or install a low-maintenance lawn alternative using micro-clover or creeping thyme that eliminates regular weekly mowing.
Simple Garden Lighting for Evenings
Exterior garden illumination expands the practical use of outdoor areas into dark evening hours. High-powered floodlights produce flat, harsh glare that blinds users and disturbs nocturnal wildlife cycles. Effective garden lighting uses low-level, layered fixtures that define steps, brighten walkways and highlight plant silhouettes.
Lay electrical conduit during initial earthwork stages before laying paving slabs or concrete footings. Low-voltage DC systems provide safety, simple installation and low running costs across wet outdoor environments.
Low Voltage Spike Lights for Garden Trees
Push warm 2700k spike spotlights directly into border soil beneath structural specimen trees like silver birch (Betula utilis) or paperbark maple (Acer griseum). Upward lighting highlights peeling bark textures and branch forms against evening skies.
Operate fixtures on low-voltage garden wiring running on twelve or twenty-four volts, connected to an IP67-rated exterior transformer. Low-voltage cables require only ten centimetres of burial beneath flower borders, avoiding the steel-wire armoring and deep trenching required by 230-volt mains power.
Lighting Up Steps and Stone Walls Safely
Where ground levels step between patios and lawns, recess downward-facing LED fixtures into step risers. Lighting step treads directly prevents tripping hazards without producing upward glare that impairs night vision.
Position surface grazing lights along the base of a retaining stone wall to highlight the texture of split stone while mounting dimmable pendants beneath a timber pergola frame to light an outdoor cooking station.
Keeping the Garden Looking Good Through Winter
Many domestic gardens look full during June and July but turn into bare ground and empty twigs from November to February. Maintaining year-round interest requires deliberate selection of evergreen foliage, coloured deciduous stems and architectural seedheads.
Our informational garden slideshow illustrates that winter texture relies on plants left intact during autumn cleanups. Leaving dried perennial stems standing until late February provides critical overwintering habitat for insects while creating frost-covered silhouettes on cold mornings.
Planting Spring Bulbs in Pots and Borders
Establish a phased spring bulb sequence by planting hardy bulbs between September and November. Snowdrops (Galanthus nivalis) begin the flowering period in January and February, followed by dwarf narcissi in March alongside Darwin hybrid tulips and purple Dutch alliums throughout April and May.
For tight spaces like a container courtyard display or small urban garden retreat, plant bulbs in glazed terracotta containers using the lasagne method. Position late-flowering alliums at a depth of twenty-five centimetres, mid-season tulips at fifteen centimetres and early crocuses at eight centimetres to produce four months of continuous container colour.
Bright Winter Stems and Dried Flower Heads
When late summer flowering perennials finish blooming, leave their stems unpruned to preserve autumn seedhead structure. Dark seedheads of cone flowers (Echinacea), Jerusalem sage (Phlomis russeliana) and tall miscanthus sinensis screens resist winter wind while providing seed sources for native finches.
Introduce winter stem colour by planting dogwood shrubs, including Cornus sanguinea 'Midwinter Fire' for amber-gold stems and Cornus alba 'Sibirica' for bright scarlet branches. Prune dogwood stems hard to five centimetres above ground level each March (coppicing) to encourage vigorous, brightly coloured young stems for the subsequent winter.
Frequently Asked Questions
What is the best time of year to start a garden makeover?
Early autumn between September and November is the optimal window. Warm soil temperatures and frequent rainfall encourage rapid root development before winter dormancy, ensuring healthy spring growth.
How do you choose the right paving stone for an outdoor patio?
Select paving materials with low water absorption and certified frost resistance. Rivington yorkstone provides traditional slip resistance, while porcelain outdoor tiles offer non-porous surfaces with certified R11 anti-slip ratings suited to wet weather.
What plants provide the best year-round privacy in a small garden?
Pleached hornbeam trees provide screening above boundary fence heights without occupying ground footprint. For dense ground-level screening, English yew (Taxus baccata) clips into narrow evergreen boundary walls.
How deep should raised sleeper beds be for growing vegetables?
A depth of 40cm to 45cm (two courses of 200mm sleepers) provides sufficient root depth for carrots and parsnips while offering an ergonomic working height that eliminates ground-level bending.
How do you prevent weeds from coming through gravel garden pathways?
Lay a commercial-grade woven geotextile membrane over a compacted Type 1 sub-base before spreading gravel. Using a honeycomb gravel grid underlay locks gravel stones into place and prevents stone movement.
What fall should a garden patio have for rainwater drainage?
A garden patio must maintain a drainage fall of 1:60 to 1:80 (12mm to 16mm of fall for every metre of paving length) sloping away from building foundations toward garden borders or linear drainage channels.